
AFS Printing
AFS Printing introduction
Please note that before the AFS are printed, the user should be comfortable with the content of the Financial Statements and that its accurate and complete. There is 3 basic checks that the user should do before the AFS are printed, Clear Mapped cells (blue and green highlighted cells), Hide sub narratives(Cells highlighted with colour in cell A) and refresh all note and policy numbering.
Steps to printing on Dynamic AFS.
Open the Financial Statements under menu item Financial Statements and sub-menu item Annual Financial Statements
Perform the three checks as mentioned above before printing to excel.
Refreshing notes and policy numbering - Click on the “Ducharme Menu”, and then on sub-menu item “Refresh Policy and Note Numbers” to ensure that all note numbers are updated.
Clearing Mapped cells - Click on the “Ducharme Menu”, scroll down to the “Mapping” sub-menu item and then click on the item therein for “Clear Mapped Cells” to ensure that all blue colours indicating mapping are cleared for printing.
Hiding sub narratives - Click on the “Ducharme Menu”, scroll down to the “Sub note Narratives” sub-menu item and then click on the item therein “hide” to ensure that all the Cells that want to be hidden is not showing.
Click on the main menu item “File”, scroll down to the “Download” sub-menu item and click on the option therein for “Microsoft Excel (.xlsx)”. This generates and downloads an Excel version of the AFS to your local drive. Save this AFS file to a location you are familiar with, with an easily identifiable name, such as: “Demo Entity AFS 2022 _ Draft 20220628”
There are others option such as pdf, however it’s not recommended, as the printed pdf will not be neat. It also leaves you with less control with regards to page settings.
General Printing tips
Don’t press ctrl + A to take out all highlights as will remove column A.
Keep Master plus 1 file incase master gets corrupted or deleted to be able to copy duplicate over to master settings
To adjust the row height manually pull down cell height online on the template.
Making use of the AFS printing platform on Dynamic AFS
The AFS Printing platform on Dynamic AFS can apply print settings for you and save all of the print settings in order to avoid the manual process of setting up print settings. Please note that it is recommended that where editing is required upon review of Printed AFS printed, those edits are made online on Dynamic AFS.
Access AFS Printing platform menu
Click on Financial Statements the menu item, and then on the sub-menu item AFS Printing. The below page appears.
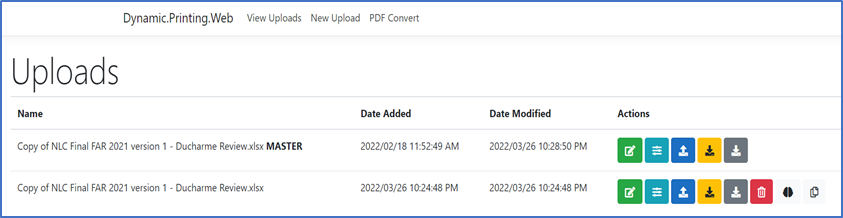
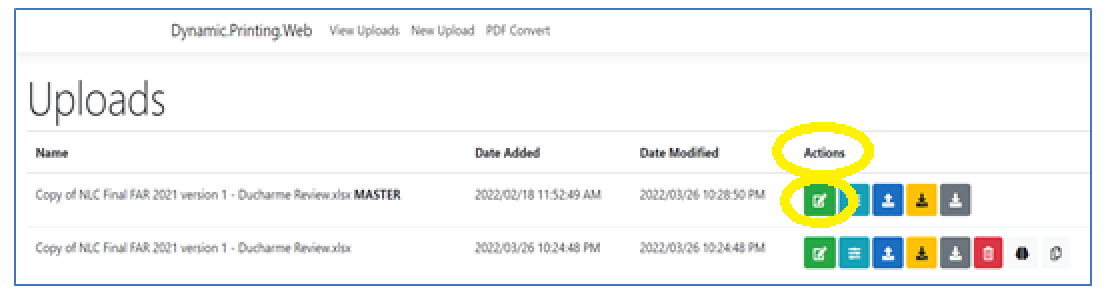
Under the “Uploads” Section you will see the previous file that was uploaded when print settings was set up, with the suffix of “MASTER” behind the name. To the right of this document is an “Actions” section with multiple icons/buttons of different colors
New upload of unshaped AFS into Printing Platform
If it’s the first time that the entity is using the Dynamic AFS then the above page should be blank, and which will mean that the user will have to do a “new upload”. The first time of using AFS Printing will require lots of time (1hour at most), however after the settings are applied going forward printing of the AFS will take you less than 5 minutes to print AFS.
Click on “new upload” and the below page should appear. Click on “Choose file“ and navigate to where the excel download has been saved and choose the file and click on “import”. The user should get a pop-up message on Dynamic AFS that the upload was successful.
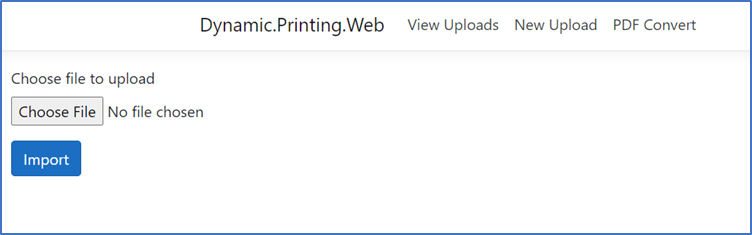
Remember before uploading to unhide all sheets on the Microsoft Excel.
Shaping of uploaded AFS inside the Printing platform
After the successful importing of the excel file, click “View Uploads” and the next page should show the imported file.

For shaping of the imported AFS, the AFS printing shaping settings and parameters can be accessed by clicking on “Edit Setting” icon under the ‘Action’ set of icons on the right hand side, by hovering with mouse pointer on the green button (first button).
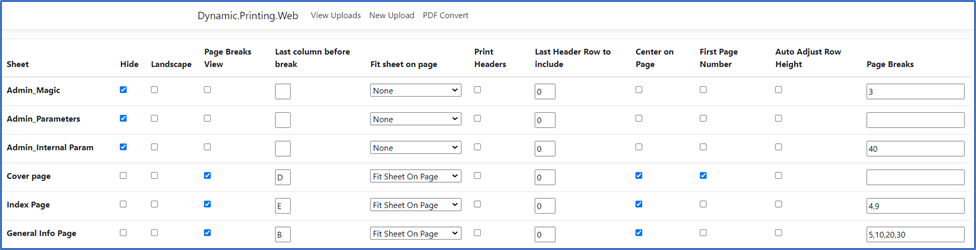
Following this, the below page should appear. Please note that the AFS printing platform is not limited to the shaping and printing of annual financial statements. This step can be applied for Management reports.
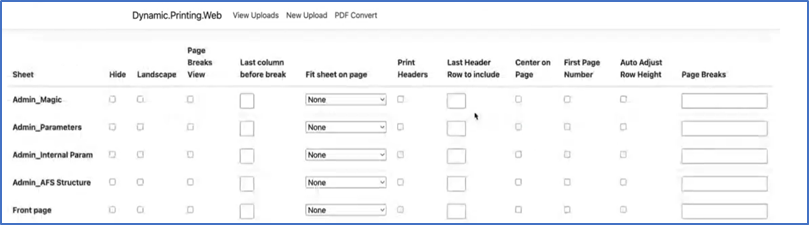
Functionality | Function |
Hide | User can choose to hide sheets. For example the Admin_magic sheet |
Landscape | User can choose to have a sheet in landscape. By default it will be portrait. The common sheet that are landscape are PPE notes and Segmental Reporting. Typically if you have multiple columns |
Page breaks view | If user wants to see the page break view. Where the page will cut off. |
Last column before break | User to select what should be the last column to be shown of AFS |
Fit sheet on page | The user has two options: option 1 fit sheet on page or option 2 fit column on page
|
Print headers & Last header row to include | If the content continues onto the next page, the user can select print headers should that the heading will also continue onto the next page. The user can also indicate how many rows to include which will continue as a header on next pages. |
Center on page | if users wants to center the content on the page |
First page number | What the first page on the Annual Financial Statements where the numbering should start |
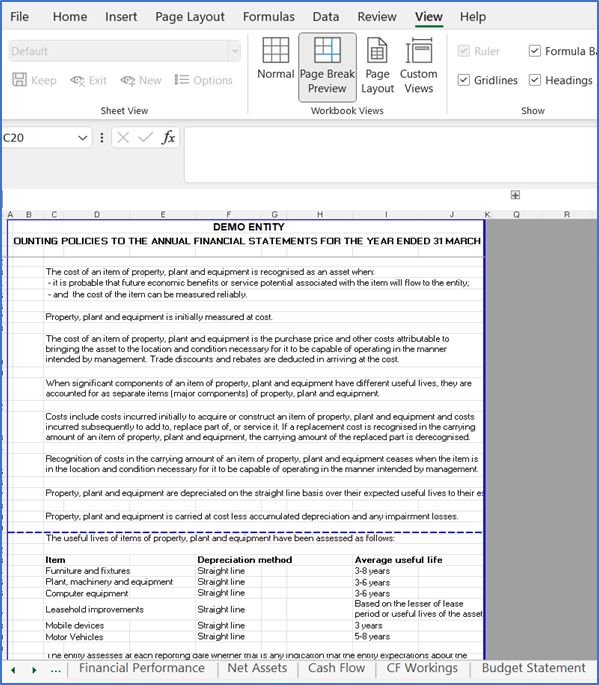
Page breaks | Are dividers that break a worksheet into separate pages for printing. Its recommended that the page breaks be done manually on Microsoft excel . To access the page break view, press (Alt + WI) for Page Break Preview. The page layout of the document should appear as below. The dotted blue line is where excel will break the page, it recommended that the user move the blue dotted line up 6 to 10 rows. The line will change to a solid blue line |
Once the page breaks has been defined manually on excel, the AFS should then be uploaded to Dynamic AFS printing.

Click on view uploads, the below should appear. Hover with the mouse pointer over the dark blue button (third button) with the arrow pointing up and click. The below page will pop up.
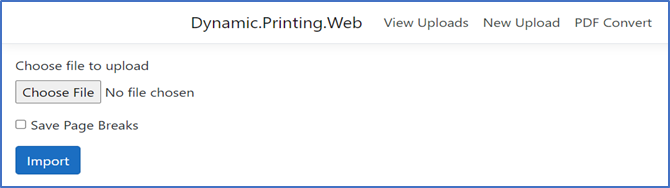
Choose the excel AFS where the page break edits was done. The “Save Page Breaks” must be ticked before the excel is imported. Please note that the only time when the “Save Page Breaks” should be ticked is when the page break settings needs to be defined.
If you navigate back to the edit settings where there above page will appear. The page breaks setting will now be defined and won’t have to be defined again.
Saving of shaping settings (Master file) to the specific document within the Printing Platform
Once the edit and shaping settings / parameters were defined, the settings should be saved and applied against the uploaded documents.
Hover with the mouse pointer over the dark blue button (third button) with the arrow pointing up and confirm on the tooltip/message that this button is for “Upload document”.
Downloading of shaped AFS from the Printing
After you have saved the shaped file, click on this button “Upload document” button. On the next screen that has presented, click on the “Choose file” button, and select the AFS as previously downloaded on your local drive.
Do not select the option to “Save Page Breaks”.
Applying shaping settings from the Master file parameters to a new uploaded document
Click on “Import” to Import this file. On receipt of a message that the upload was successful, click on “View Uploads” at the top of the page. You should then see that for the Master file listed on this screen, the “Date Modified” field has been amended to the current date and time on which you uploaded.
However, over the second icon with the tooltip for “Apply Settings”, and click on this button.
When a message is shown indicating that settings have been successfully applied, click on the grey icon to the far right, with the arrow pointing down, the “Download converted document” button.